
How to Install Carpet Tiles Without Glue
Getting new carpeting can make a space look and feel better. Installing traditional rolled carpets can be a lot of work and cost a lot of money. Waiting for an expert carpet installer to have time for your project can also be frustrating. Good news by Design Furniture! By learning how to install carpet tiles, you can get the same appearance and texture without spending as much time or money.
Do Carpet Tiles Are Easy to Install?
Putting in carpet tiles is simple and inexpensive because it’s a job you can do yourself. These tiles provide a great opportunity for houses with children and pets that can easily be replaced. Replacement means you can change the tile on which spill or any pet debris or poop occurs.
Carpet Tile Installation
- First, you need to calculate the materials you will need.
- Make sure you have plenty of tiles and mastic if you need it. To find the square footage of a room, you can multiply its length by its width.
- To find out how many carpet tiles you need, divide the total area of the space by the size of one carpet tile. Remember to add 10 to 15 percent for errors or future replacements and repairs.
- To calculate the number of carpet tiles needed for a room 12 feet wide by 12 feet long, use 24-inch square carpet tiles.
- Each tile should be 2-by-2-foot tile is 4 square feet.
- Divide 144 feet by 4 feet each tile to determine the number of tiles required. The outcome is 36 tiles
- To find 10 percent extra of 36, multiply 36 by 0.10. The answer is 3.6 tiles.
- To find the number of tiles needed, we add 36 to 4 times 3.6 rounded to 4. This equals 40 tiles required.
- The glue bottles indicate how many square feet they can cover without peel-and-stick tile. To find the correct amount, compare it to the size of the room.
Space Required for Its Installation
Before putting down carpet tiles, you need to prepare the room. To start, arrange your tiles in a specific order.
- Divide the room by one tile to calculate tile quantity. Add 10% for waste and repairs.
- It would help to prepare your floor a day before the carpet tiling installation.
- To easily remove the baseboards, use a pry bar and be gentle. Keep them aside so you can put them back later. Adding tiles into the room helps to regulate internal temperature.
Mark the Central Point of the Room
To ensure your installation is consistent, start in the middle of the room and work towards the walls.
- Mark the middle of each wall on the subfloor. Use chalk to draw a straight floor line. Two parallel walls should have this line between their marks. The lines should meet in the middle of the floor.
- Start by placing carpet tiles along chalk lines without adhesive. Position them correctly from the center. Build up to the wall with complete tiles.
- If the gap between the final tile and the wall is over fifty percent the carpet tile width, relocate the row to add another tile. Choose a side of the room for complete tiles.
Testing of Layout is Important
Begin in the middle and place the carpet tiles along the two lines, moving towards the wall. If the space between the wall is smaller than half of a tile’s width, adjust your starting point and lines until you can fit at least half of a tile.
Start Placing the Tiles
- Adjust the initial rows of these tiles before putting them. Remember, carpet tiles have pile direction. Check the tile back for an arrow.
- All arrows should face the same direction for convenient installation. You may also arrange their rotation.
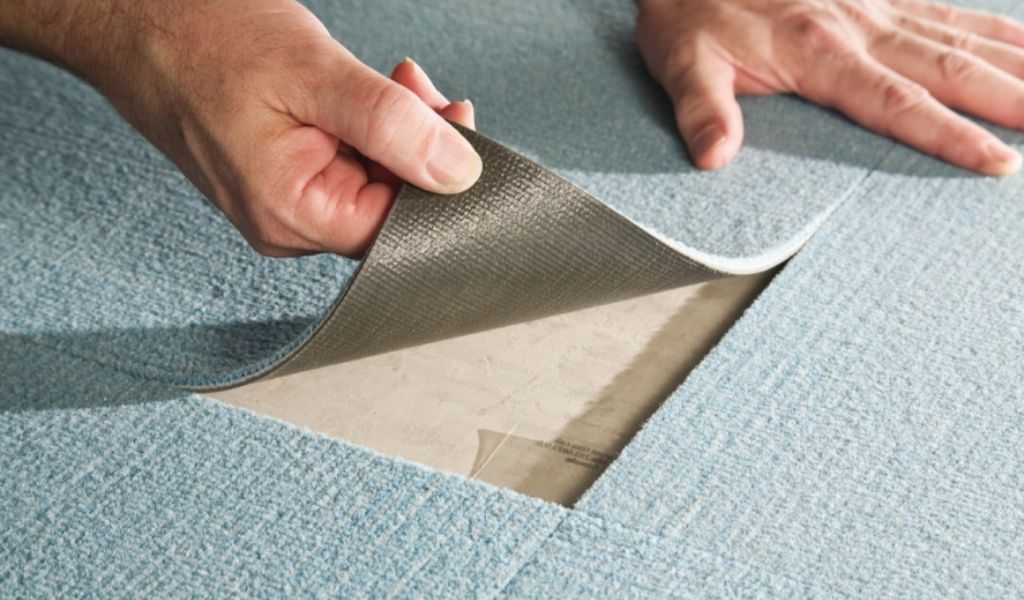
- To use peel-and-stick carpet tiles, remove the plastic film or paper to reveal the adhesive back.
- Place the tile lightly on the floor and straighten it to ensure proper placement. When satisfied with the tile’s location, push it into place.
- Spread glue on the floor using a V-notch trowel if carpet tiles don’t stick. Cover enough space for two or three tiles.
- Read and follow manufacturer directions. Some mastic must be sticky before installation.
- Put the tile lightly on the adhesive material to align the carpet. Avoid getting sticky stuff on the carpet. Press the tile into position with your hand.
Cut and Put the Carpet Tiles on the Walls
Once you have laid most of the floor, cutting the pieces along the walls to the right size is easy.
- Find the wall-to-last-tile spacing. Mark a carpet tile at the same distance using that measurement. Cut the carpet tile with an even edge and utility knife to fit.
- Sometimes, walls are not completely straight, so you should expect all the carpet tiles to be different sizes. Go slowly and measure each space one at a time. Make sure pile direction is correct before cutting.
- After cutting, put these carpet tiles in place like before.
Use the Carpet Roller to Finish the Job
- Once the carpet tiles are put in, it’s time to ensure they stay in place forever.
- To ensure the adhesive sticks well to the subfloor, use the carpet roller to go over each tile in different directions multiple times.
- If you removed the baseboards before getting ready, put them back on after rolling the carpeted area.
- The carpet tiles are all installed now. If you have mastic carpet tiles, read the manufacturer’s instructions before vacuuming because they might need some time to dry.
In the End
You can easily upgrade your flooring using carpet tiles that don’t require adhesive. You can change your environment without adhesive or waste utilizing the easy ways above. Carpet tiles are very flexible, so you can create patterns and designs to match your style. Don’t worry about glue. Focus on how easy it is to install. You can easily install carpet tiles without using adhesive. This will give you a beautiful floor that will last a long time.


